Step 6: Position the four remaining pieces
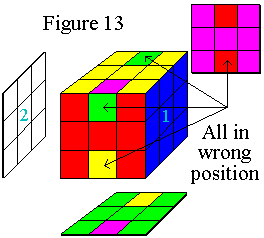
Position the cube as shown in Figure 13, with side 1 on the right. Now the slice we have been calling the middle horizontal slice has become the middle vertical slice, V. Rotate the middle vertical slice and side 2 until each middle-center piece matches up with its corresponding side 1 and side 2 edge and corner pieces. Examine the four remaining center-edge pieces.
If none of the four center-edge pieces is in the correct position:
|
Position the cube as shown in Figure 13, placing side 1 on the right and side 2 on the left (the rest don't matter here). Perform Move 7, then proceed to step 6b. |
|
Move 7: V U2 V-1 U2 In words, rotate the middle vertical slice (between the blue and white sides) one quarter turn clockwise (away from you), the top side (yellow here) two quarter turns (half-way around), the vertical slice 1/4 turn counter-clockwise (back toward you), and the top half-way around again. |
|
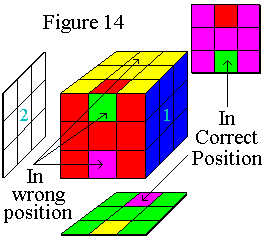
If just one of the pieces is in the correct position:
|
Position the cube as shown in Figure 14, placing the correctly positioned (not necessarily oriented) center-edge piece to the back of the cube so that it cannot be seen. Perform Move 7, one, two, or three times until each center-edge piece is in the correct position. Proceed to step 6d. |
If two pieces are in the correct position, but are diagonal to one another
Position the cube as shown in Figure 16, perform Move 8, and proceed to step 7a.
When all four center-edge pieces are correctly positioned, proceed to step 7.