Step 4: Complete side 2
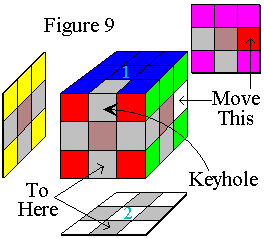
- The four remaining pieces for side 2 should be scattered throughout the unsolved portion of the cube. To insert each piece, set up the cube by rotating the center slice (between the blue and white sides) to position the desired piece as shown in Figures 9 or Figure 10, then follow the directions given. In the figures, the piece to be inserted is the Red-White middle edge piece. The move will insert it into side two, orienting it in the correct way.
- There are two different moves, since the piece could initially be positioned one of two ways. In both moves, the piece to be positioned moves through the keyhole -- a hole we'll make in the already solved blue side to allow pieces to pass through it without disturbing the rest of side 1. The first time you use Move 3 or Move 4 you will remove a piece from side 1 and create the keyhole. From then on, use the keyhole as directed below to move pieces through it and leave side 1 undisturbed.
- In order to get your cube to match Figure 9 or Figure 10, you will need to rotate side 2 (the bottom) and the center slice, putting the piece to be positioned on the back right, and the spot where it goes in the front.
|
If the cube looks like Figure 9, then Move 3 will put the piece into place. |
|
Move 3: F H2 F-1 In words, rotate the front side (red here) one quarter turn clockwise, then the middle horizontal slice (containing the red, green, pink, and yellow middle-center pieces) two quarter turns (half-way around), then the front side one quarter turn counter clockwise. |
|
|
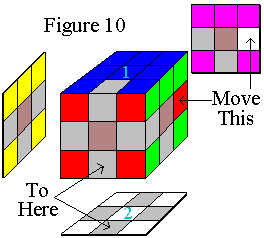
If the cube looks like Figure 10, then Move 4 will put the piece into place. |
|
Move 4: F-1 H F In words, rotate the front side (red here) one quarter turn counter clockwise, then the middle horizontal slice (containing the red, green, pink, and yellow middle-center pieces) one quarter turn clockwise (so that the red/white corner piece moves toward the front), then the front side one quarter turn clockwise. |
|
- Continue to use the keyhole to insert the three remaining side 2 center-edge pieces. Just be sure to always move pieces through the keyhole and not to disturb any other pieces on the top. Instructions are available to explain this in more detail.
- If one of the pieces needed is already in side 2, but positioned or oriented incorrectly, simply move it out of side 2 by using Move 4.
- If one of the pieces needed is in the keyhole, then set up the cube as shown in Figure 10 and use Move 4 to move it out. When doing this, don't worry about what piece is in the back right edge. Just be sure to rotate side two such that an uncompleted edge is facing forward.
- Detailed diagrams and instructions covering the above two exceptions are available.