

These instructions can be used to solve the Pyramix (or Pyramid) starting from any combination of colors on a mixed up Pyramix. The Pyramix, inspired by Rubik's cube, is a four-sided tetrahedron (pyramid) puzzle. The instructions are both easy to follow and easy to memorize. This HTML solution is an implementation of directions from an ASCII file by Jonathon Bowen. This is only one of two pages I know of on the Web with graphical solutions for solving the Pyramix. Directions for solving the Rubik's Cube (3x3x3) or Rubik's mini cube (2x2x2) can be found here. I would appreciate any and all feedback or questions about the instructions; see the bottom of this page for the e-mail address (I had to remove the easy mail-to option due to increasing spam).
Unfortunately, the Pyramix is no longer for sale, and the only location I know of where it may be available is at www.puzzletts.com
|
|
My directions for Solving the Rubik's Cube (3x3x3) - these also apply to the 2x2x2 |
|
|
See Denny's solution for solving the 3x3x3 cube. This is a more detailed solution for the 3x3 than the one I provide (mirrored from the now missing http://www.calormen.com/vpm/puzzlesolutions/rubikscube/) |
|
|
See Denny's solution for solving the 4x4x4 cube (mirrored from the now missing http://www.calormen.com/vpm/puzzlesolutions/revenge/) |
|
|
My directions for Solving the Professor Cube (5x5x5) |
|
|
My directions for Solving the Square 1 |
As a preview, the steps are:
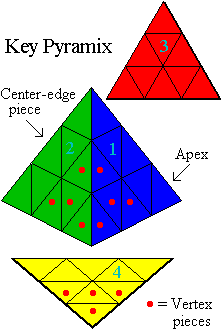
The figures in this document represent a sample Pyramix. Although the colors on your personal Pyramix may be different than the figures, I feel that the colored figures will still be helpful in solving the Pyramix. I would suggest matching as many colors on your Pyramix as possible to the figures, then making mental notes about which colors correspond between your Pyramix and the figures. For example, perhaps you can match the green and blue sides exactly, but the yellow in the figures corresponds to red on your Pyramix. Just keep this equivalency in mind when looking at the figures. In addition, I have numbered the pieces according to color for reference in case this helps to keep track of the colors more easily. Finally, the diagrams show all four sides of the Pyramix by pretending that mirrors are being held up so that you may see the "hidden" sides. If you have trouble discerning the difference between green and yellow, try this alternative page.
If you examine your Pyramix, you will notice that the four apexes (tips/peaks) are each connected to their own individual piece and can never be removed from this piece. This means that the orientation of each apex is irrelevant to solving the Pyramix; we only orient them correctly in order to make the side aesthically pleasing. The challenging task is to correctly place the six center-edge pieces. These pieces will simply be referenced by their color, for example the green-red center-edge piece in the Key Pyramix.
The directions for what parts of the Pyramix to turn and when are given in a code that is relative to the current positioning of the Pyramix. The only description needed is a code for the four vertexes of the cube, where a vertex is defined as not just the apex (tip), but also the next level/row below/attached to the apex. Thus, in the Key Pyramix, one of the four vertexes is denoted by a red dot on each piece that composes the vertex. For a given orientation, the four vertexes can be identified as F for the front vertex, R for the right vertex, L for the left vertex, and U for the upper vertex. Thus, in the Key Pyramix, the green-blue-yellow vertex is the front vertex, the blue-yellow-red vertex is the right vertex, the green-blue-red vertex is the upper vertex, and the green-yellow-red vertex is the left vertex. Since these labels apply to the current orientation of the Pyramix, this means that the front vertex can be different colors, depending on the diagram being used.
Perform the moves by rotating the specified vertex clockwise if just the letter is given or counterclockwise if a - (minus sign) follows the letter. For example, F U F- means to rotate the front vertex clockwise one turn (120 degrees), the upper vertex clockwise one turn, then the front vertex counterclockwise one turn. Look directly at the specified vertex to determine which direction is clockwise or counterclockwise.
In the figures, any gray pieces represent pieces that don't matter and can be any color. To increase clarity, however, I have shown a lot of colored pieces. In most cases, the figures actually represent an example of the situation being described, while the colors don't have to match perfectly, particularly when I describe correctly positioned yet incorrectly rotated pieces.
• Step 1: Start solving one side of the Pyramix (side 1 in the figures)
|
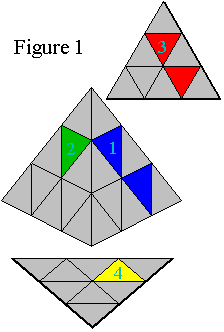
Pick a color to represent the first side of the Pyramix to be solved (side one in the diagrams). Rotate the vertexes until you have two vertexes of the same color beside one another as shown in Figure 1. |
These first few steps involve you simply rotating vertexes such that colors match up. Notice in Figure 1 that the red colored vertexes match up also. It is possible to get two blue vertexes to match up, yet not have the vertexes on the other sides of the Pyramix matching up. You must avoid this situation. Simply try various combinations until you get two vertexes matching up not on just one side, but on the adjacent side (for example on the right and back sides, as shown in Figure 1).
• Step 2: Complete lining up the vertexes of Side 1
|

|
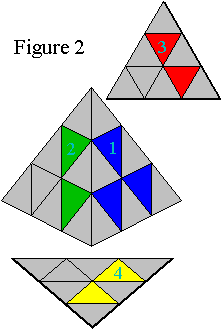
| Complete lining up the vertexes of the first side, as shown in Figure 2. Be sure that the vertexes on the adjacent sides also line up. | As indicated in Figure 3, rotate the apexes of each of the vertexes in order to make the colors line up. |
The first side is completed by inserting the center-edge pieces into their appropriate positions such that their colors line up. The center-edge piece needed to fill a position should be located somewhere in the left vertex (provided the pyramid is oriented such that side 1 is the right side). If a needed piece is located somewhere in side 1, move it out using Move 1, then proceed to step 3a or 3b, whichever is appropriate.
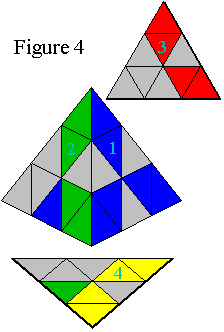
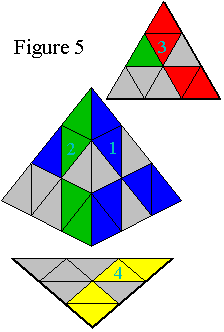
To insert the center-edge pieces, rotate the Pyramix so that the center-edge piece to be inserted matches the location in Figure 4 or Figure 5, keeping side 1 on the right).
|
a. If the Pyramix matches Figure 4, then insert the piece by performing Move 1 |
| Move 1: L- F- L F | |
|
b. If the Pyramix matches Figure 5, then insert the piece by performing Move 2 |
| Move 2: L U L- U- | |
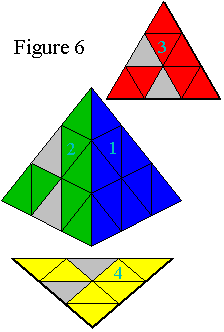
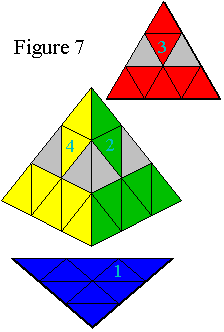
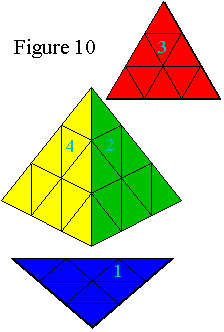
Side 1 should now be complete and the fourth vertex can be rotated to correctly match up the colors, as shown in Figure 6 below. Next, rotate the Pyramix such that Side 1 is facing downward, as shown in Figure 7, and proceed to step 5.
|
|
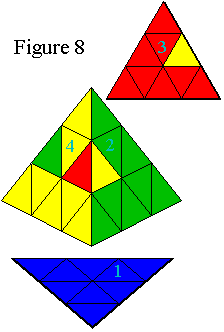
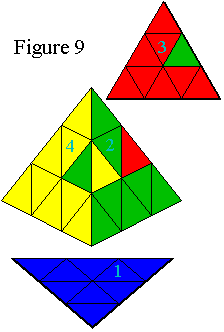
With the Pyramix positioned as shown in Figure 7, examine the three remaining center-edge pieces to see if they are in the correct position. For example, none of the three remaining center-edge pieces in Figure 8 is in the correct position, while those in Figure 9 are in the correct position. Note that a piece may still be oriented incorrectly (for example the green-yellow center-edge piece in Figure 9) but this problem will be corrected in step 6.
|
If necessary, use Move 3 once or twice to exchange the remaining center-edge pieces until the pieces are correctly positioned (though not necessarily oriented). |
| Move 3: F U F- U F U F- | |
Note: This move should leave side 1 undisturbed (once the move is complete). If side 1 is messed up after you have completed Move 3, then you did not perform the move correctly and you should go back to step 3.
• Step 6: Correctly orient the two remaining center-edge pieces
The Pyramix will now be solved, or two of the center-edge pieces will be oriented incorrectly. Use Figure 9 and Move 4 to correctly orient the last two center-edge pieces.
|
Align the Pyramix as shown in Figure 9 with the two incorrectly oriented pieces located on the right and side 1 on the bottom. Perform Move 4 to flip these pieces. |
| Move 4: F R- F- R U- R U R- | |
|
Congratulations!! The Pyramix should now be solved. |
I hope you have found these directions to be clear and complete, yet concise. If these directions help you to solve the cube, I would enjoy hearing from you.
The crux of these instructions was written by Jonathan Bowen whose address was given in the ASCII document as:
However, these instructions are from v1.1, April 1985 (originally created January 1982) and the address could very well be incorrect. Additionally, I removed two of the moves he listed since they weren't necessary and modified Moves 1 and 2 to make them more clear.
Contact info: I appreciate receiving e-mails describing your success with these directions, but I cannot provide any additional help in solving the Pyramix beyond the instructions and steps shown here. Please also e-mail if you have problems accessing a page or seeing a graphic.

Last Modified January 1, 2008